
Roof Flashing in Houston: The #1 Leak Prevention Detail Explained
If there’s one part of a roof system that determines whether it leaks or not, it’s not the shingles—it’s the flashing.
Flashing is what protects all the transitions and edges where water is most likely to get in. And in Houston, where heavy rain and wind-driven storms are common, those transitions are where most leaks begin.
This guide explains what roof flashing is, where it’s used, why it fails, and how proper flashing details prevent leaks.
What is roof flashing?
Roof flashing is a material—usually metal—installed at joints, seams, and transitions to direct water away from vulnerable areas and back onto the roof surface where it can drain properly.
Instead of relying on sealants or surface materials alone, flashing works by:
creating overlapping layers,
directing water downhill,
and preventing water from reaching the underlying structure.
This layered approach is fundamental to how roof systems manage water.
Where flashing is used on a roof
Flashing is installed anywhere the roof changes direction or meets another surface.
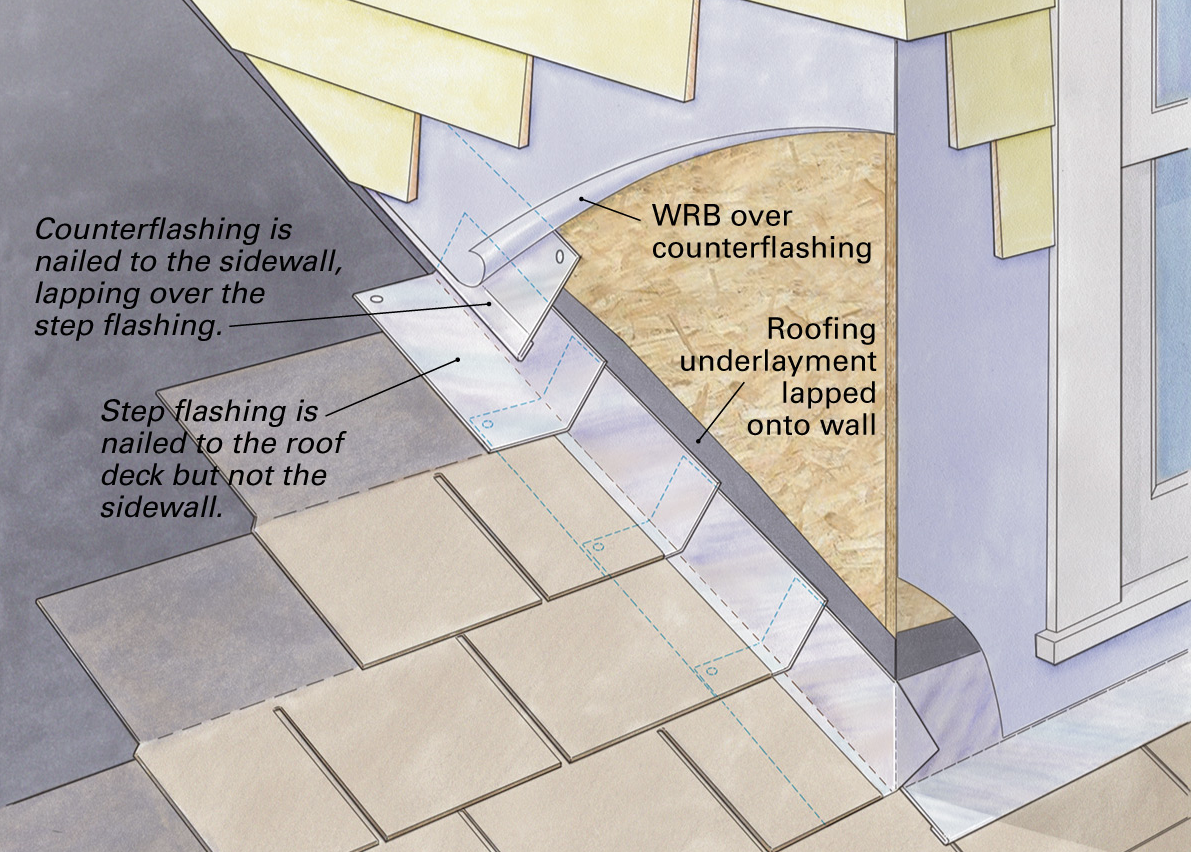
Roof-to-wall intersections
Where a sloped roof meets a vertical wall, flashing is required to keep water from entering behind the siding.
This typically includes:
step flashing (installed with each course of shingles),
and sometimes counterflashing depending on the wall system.
These areas are one of the most common sources of leaks in Houston.
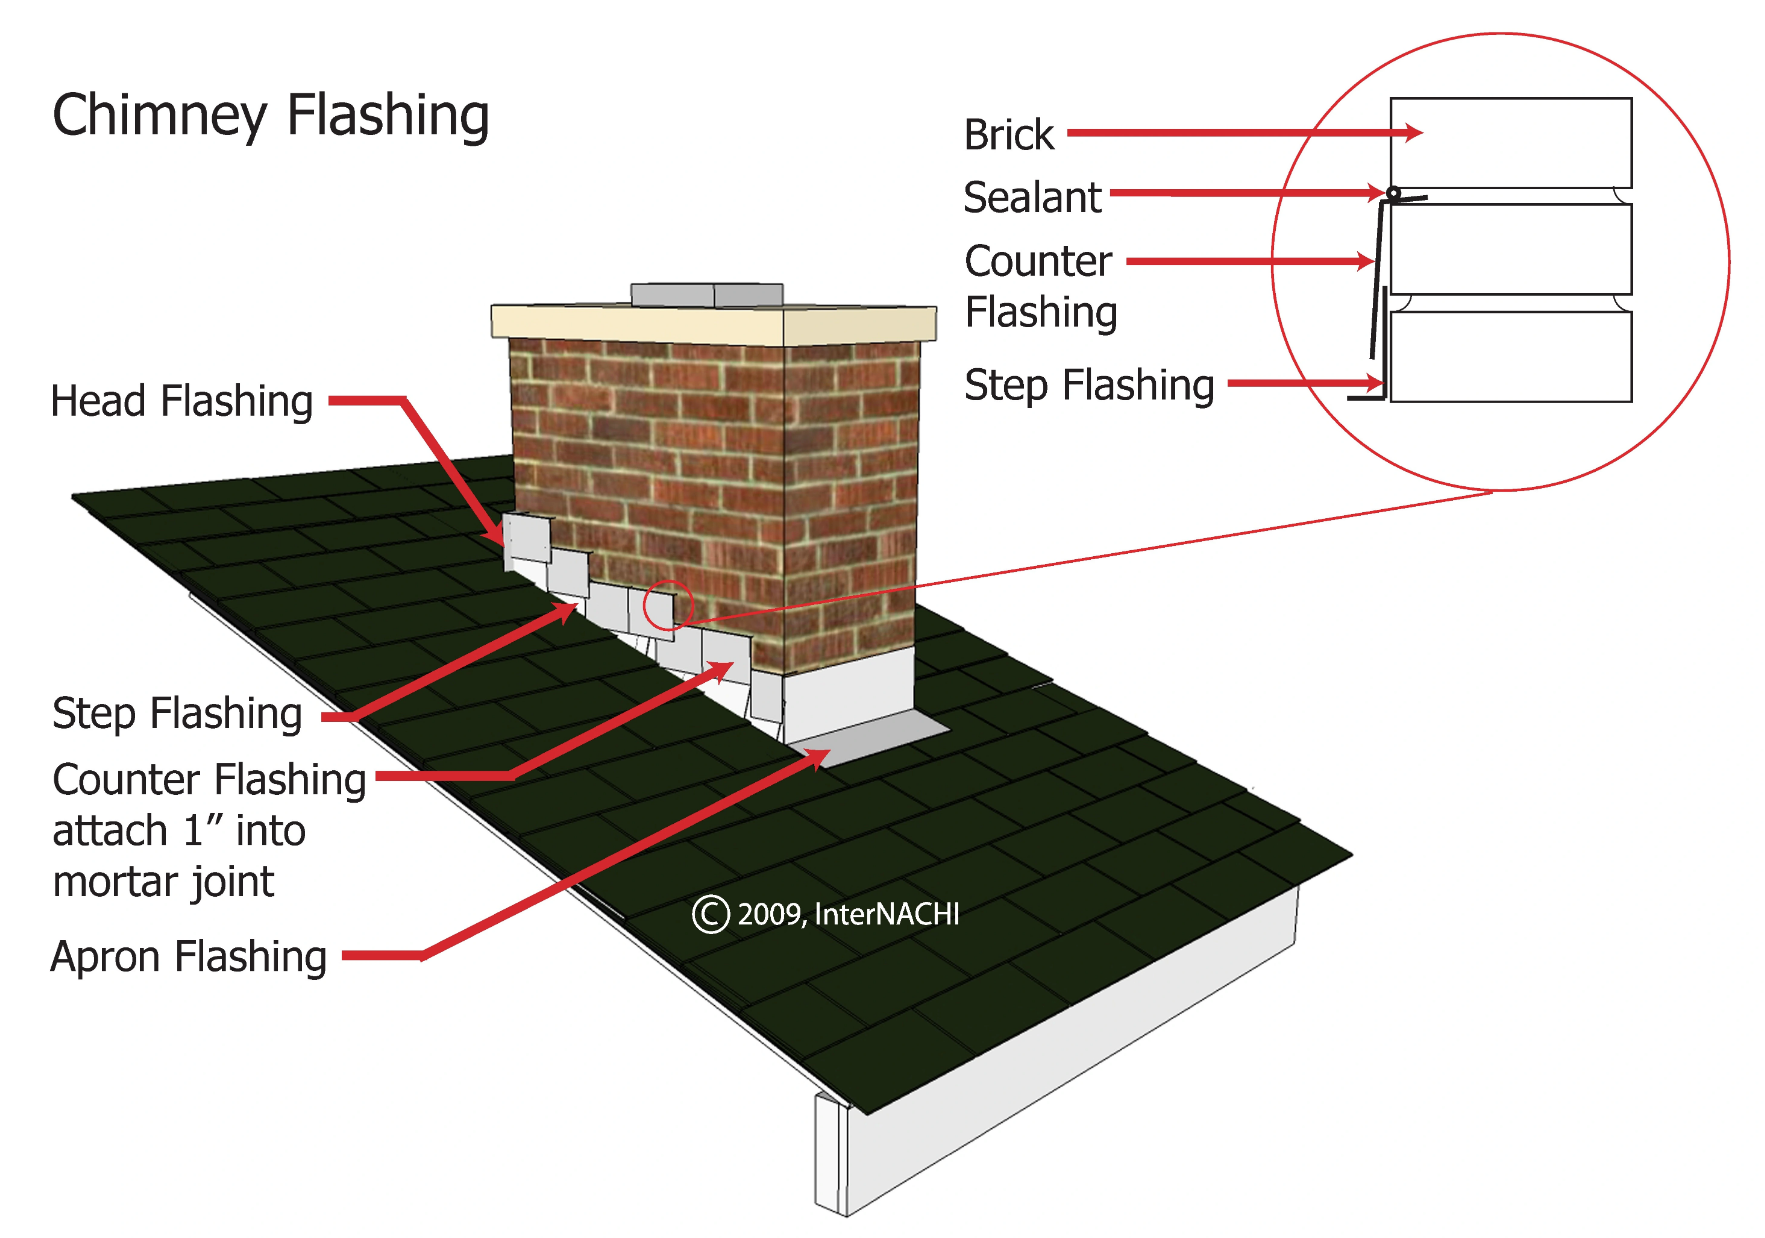
Chimneys
Chimneys require a multi-part flashing system:
base flashing at the front,
step flashing along the sides,
and counterflashing embedded into the chimney structure.
If any part of this system fails or separates, water can enter quickly—especially during heavy storms.
Valleys
Valleys handle a high volume of water. Flashing (or properly installed valley systems) ensures water flows efficiently through these channels.
Any disruption in this area can lead to concentrated water intrusion.
Roof penetrations
Penetrations include:
pipe boots
attic vents
exhaust vents
skylights
These areas rely on integrated flashing systems to seal the opening while allowing for movement.
Roof edges and terminations
At the edges of the roof, flashing helps direct water into gutters and prevents it from getting underneath roofing materials.
Why flashing fails (especially in Houston)
Flashing doesn’t usually fail randomly. It fails for specific, identifiable reasons.
1) Improper installation
If flashing isn’t installed in the correct sequence or layering pattern, water can bypass it.
For example:
missing step flashing at wall intersections
incorrect overlap between flashing pieces
reliance on sealant instead of proper layering
These issues often don’t show up until a storm tests the system.
2) Movement and separation over time
Roof systems expand and contract with temperature changes. In Houston, heat can be intense, and materials move daily.
Over time, this can cause:
flashing to pull away from surfaces
fasteners to loosen
seams to open
Once that happens, water has a path in.
3) Sealant failure
Sealants are sometimes used in flashing details, but they are not meant to be the primary defense.
In Houston’s heat and UV exposure, sealants can:
dry out
crack
lose adhesion
If a flashing system relies too heavily on sealant instead of proper design, it will eventually fail.
4) Missing or incorrect kickout flashing
At the bottom of roof-to-wall intersections, a kickout flashing is required to direct water into the gutter.
Without it:
water can run behind siding
enter the wall cavity
and cause hidden damage over time
This is one of the most common overlooked flashing issues.
Why flashing matters more than shingles for leak prevention
Shingles are designed to shed water downward.
Flashing is designed to handle water where shedding alone isn’t enough—at joints, transitions, and edges.
In other words:
shingles handle the surface
flashing handles the details
And leaks almost always start at the details.
Signs of flashing problems (that homeowners can spot)
From the ground or inside the attic, look for:
leaks that occur during wind-driven rain
water stains near walls or chimneys
discoloration or streaking on siding near roof lines
visible gaps or separation at roof intersections
rust or deterioration on exposed metal flashing
These are indicators that flashing may be compromised.
What NOT to do when flashing fails
These are common mistakes:
Applying caulk over flashing seams
This may temporarily slow water but doesn’t fix the underlying issue.Replacing shingles without addressing flashing
If flashing is the problem, new shingles won’t solve it.Ignoring small leaks near walls or penetrations
These often indicate flashing failure and can worsen quickly.
How proper flashing prevents leaks
A properly installed flashing system:
uses layered materials to direct water outward and downward
integrates with shingles and underlayment
does not rely solely on sealants
allows for movement without creating gaps
This approach is based on water management—not just sealing surfaces.
When to have flashing inspected
You should consider an inspection if:
your roof is 8–10+ years old
you’ve experienced leaks during storms
you notice staining near walls or penetrations
a recent storm brought high winds or heavy rain
Early inspection helps identify flashing issues before they lead to larger repairs.
Ready for the next step?
Roof inspection / services: https://communityroofingtexas.com/roofing-services
Free online roof estimate: https://communityroofingtexas.com/free-estimate
Community Roofing Texas helps Houston homeowners identify and correct flashing issues at the source—so leaks don’t keep coming back with every storm.